Outlook Express 6 ok, but when tried to send e-mail there is following error message - 'The server does not support a SSL connection. Account: 'pop3.live.com', Server: 'smtp.live.com', Protocol: SMTP, Server Response: '250 OK', Port: 25, Secure(SSL): Yes, Server Error: 250, Error Number: 0x800CCC7D'.
Change the out going port : 25 to 587 it may work.
Thursday, February 25, 2010
Wednesday, November 25, 2009
How to Take Back 20% of Your Bandwidth From Windows XP
 Microsoft reserves 20% of your available bandwidth for its own purposes (suspect for updates and interrogating your machine etc..) Here’s how to get it back:
Click Start–>Run–>type “gpedit.msc” without the “
This opens the group policy editor. Then go to:
Local Computer Policy–>Computer Configuration–>Administrative Templates–>Network–>QOS Packet Scheduler–>Limit Reservable Bandwidth
Double click on Limit Reservable bandwidth. It will say it is not configured, but the truth is under the ‘Explain’ tab :
“By default, the Packet Scheduler limits the system to 20 percent of the bandwidth of a connection, but you can use this setting to override the default.”
Read more: http://www.realtechnews.com/posts/3113#ixzz0XrhYQCFX
Sunday, September 27, 2009
How to Remove and Hide Blogger NavBar (Top Navigation Bar)
When browsing Blogger powered weblogs
hosted on blogspot.com domain or custom domain, there is always a NavBar (Navigation Bar or Banner) that appears on top of the blog. The Blogger NavBar contains Search Blog textbox, Flag Blog
to notify Blogger about objectionable contents on the blog, Next Blog link to visit another blog randomly, plus links to create a blog or sign in to Blogger.
No many visitors nor bloggers themselves may find it useful though. It’s possible to hide and remove the NavBar with a little CSS hack. The trick will not interfere or mess up with the custom layouts that webmaster has designed, and pretty safe and easy to implement. In fact, if you’re publishing the Blogger blog to own custom domain with FTP or SFTP, it’s possible to turn off NavBar.
Turn Off and Disable NavBar in Blog Published by FTP or SFTP
1.Login to Blogger.
2.On the Blogger Dashboard, click on the Template link of the blog that you want to disable its NavBar. You can also click Customize on NavBar while visiting your blog.
3.The Edit HTML page under Template tab should be loaded. Click on the drop down box beside Change the Blogger NavBar and select Off.
4.Click on SAVE TEMPLATE CHANGES button when done.
Remove and Hide NavBar in Blogger Widget Template
1.Sign in to Blogger.
2.On the Blogger Dashboard, click on the Layout link of the blog that you want to disable its NavBar. You can also click Customize on NavBar while visiting your blog.
3.Under the Layout tab, click on Edit HTML tab to view the template’s HTML code.
4.Search for the following line of code:
]]>
Before the line, add in the following line of code:
#navbar { display: none; }
or:
#navbar-iframe { display: none !important; }
5.Click on SAVE TEMPLATE to make the change effective.
Remove and Hide NavBar in Blogger Classic Template
1.Login to Blogger.
2.On the Blogger Dashboard, click on the Template link of the blog that you want to disable its NavBar. You can also click Customize on NavBar while visiting your blog.
3.The Edit HTML page under Template tab should be loaded. If not, go to the tab.
4.Search for the following line of code:
< /style>
Then, add the following line of code before that line:
#navbar-iframe { display: none; }
The Blogger Classic Template uses iframe to load the NavBar, and styles it with ID named navbar-iframe. The name actually also works for new Blogger Widget Template too.
5.After hiding the Nav Bar in Blogger using Classic Template, there tends to be a gap that replaces the navigation bar. The gap may be white, red, green, blue, or black in color, depends on what is your background color. To remove the gap, find the following code (normally near the top of the HTML):
body {
Add in the following like of code after the body tag:
position: relative;
top: -32px;
6.Click on SAVE TEMPLATE CHANGES button when done.
Tip: To display and show NavBar again, just remove and delete the additional codes that have been added.
In Windows, if we right-click on CD/DVD drives, we get an option to "Eject" the tray but we don't get option to "Insert" the tray. In this tutorial, I'll tell you a trick to add "Insert" option in CD/DVD drives context menu.
http://img.photobucket.com/albums/v374/vishaal_here/Add_Insert_Option_in_CD_DVD_Context.jpg
Here is the step-by-step procedure:
1.) Download following zip file, extract it and copy the DLL file to "%windir%\System32" folder:
cdeject.zip
2.) Now download following zip file, extract it and then run the .REG file:
insert_reg.zip
That's it. Now you'll get an extra option "Insert" in CD/DVD drives context menu, which will make the life easier and you'll not have to press the insert button at your CD/DVD drive each
time.
Source http://www.askvg.com/add-insert-option-in-cddvd-drive-context-menu/
Friday, September 11, 2009
Unicode Help Pages
 Unicode is an international standard to encode written characters in the computer. XOBDO uses unicode to display Indic Languages, i.e., Assamese, Bodo, Mising, Bishnupriya texts. Bodo uses Devanagari scripts whereas Assamese, Mising, Bishpriya etc use Eastern-Nagari Script. If your computer is NOT setup properly, you may not see Unicode characters (e.g. উল্লেখযোগ্য) correctly as shown below...


This is how you should see
 .
.How to configure Indic Language Support ?
To configue your computer, you need to(1) install unicode fonts. You can download such fonts from : (a) Chicago University's Page, (b) Wazu's Website , or (c) Ekushey.Org
(2) enable Indic Language supports. Windows XP and Vista come with all the required files. How to enable Indic Language Support can be found in Wikipedia .
How to write in Unicode (Assamese, Bodo, Manipuri etc)?
Once your computer is properly configured for Unicode display, you may like to write or type in Unicode. There are a lots of free software available in the internet that enables to do so. Two most common software that supports Indic scripts are: 1. BARAHA, 2. AVRO, or 3. Ekushey.OrgXOBDO's volunteers also developed a keyboard to carry out the task. Please find the details here...
 .
.Alternatively, you can use XOBDO's online SmartKeyboard 1.0
Wednesday, September 9, 2009
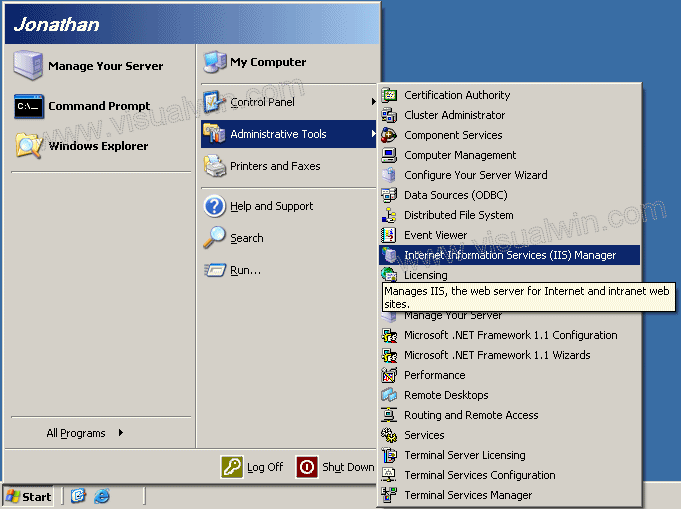
Setting Host Headers in IIS 6.0
Preface:
Many people would like to have several web sites hosted on their own computer, maybe they want something like hello.domain.com and goodbye.domain.com both on the same computer. IIS can use host headers to see what the end user tried viewing, and it will show the correct web page based on that.
Method:
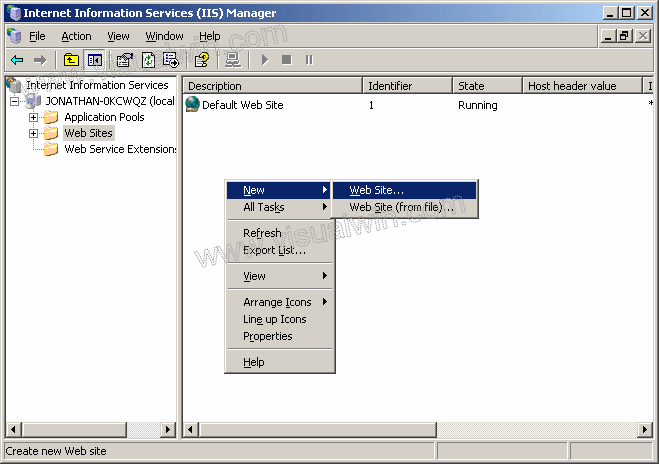
Load IIS from the Administrative tools in the Control Panel by clicking Start -> Administrative Tools -> IIS Manager (or loading the Control Panel, entering the Administrative Tools folder, and double clicking IIS Manager).
On the left side, expand your computer name, then click "Web Sites", right click in the right side, put your mouse over "New" and select "Web Site..."
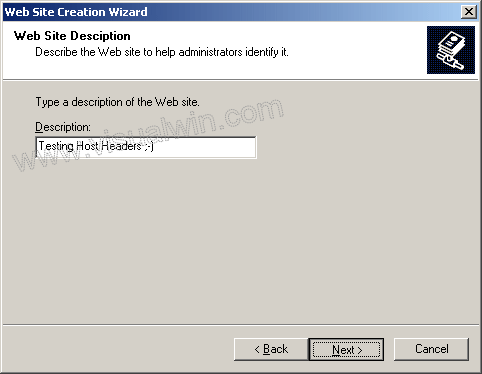
Click Next in the dialog, then put in a description of the new web site you are creating (can be anything)
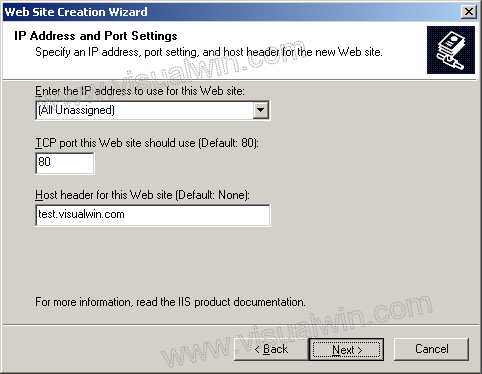
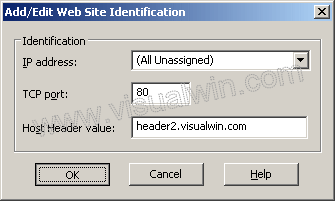
Now here's the important part. Go to the last text box and put in what you want the new Host Header to be
Now put in the path to your new site and make sure you keep "Allow anonymous access" checked
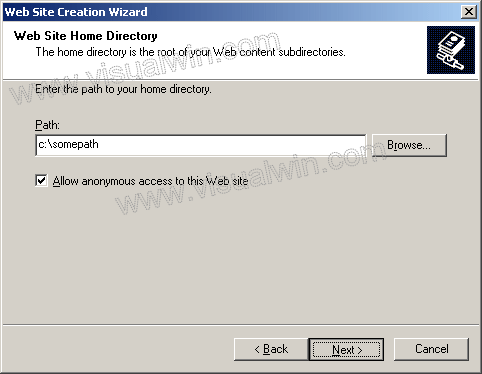
For added security, if you don't plan on using ASP or anything similar, then uncheck "Run scripts". You can always enable it at another time
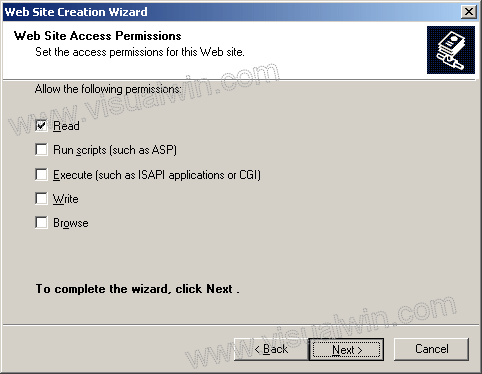
Click Finish on the next dialog and you're done!
Questions:
Q: How do I add a host header for a site already made?
A: Go back to where we were before. Click on "Web Sites" and right click the website and select "Properties"
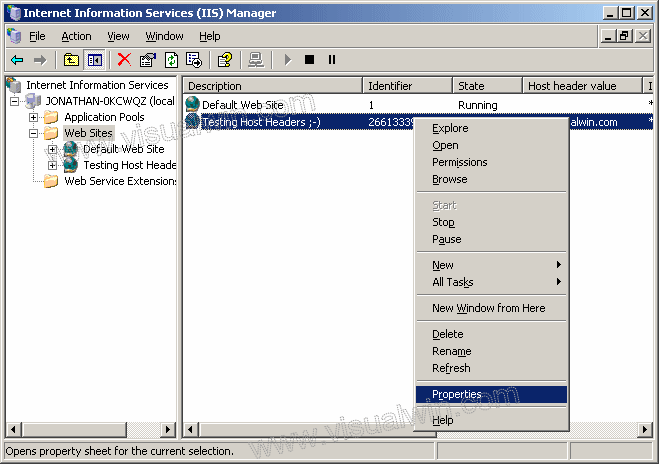
In that dialog click the Advanced button
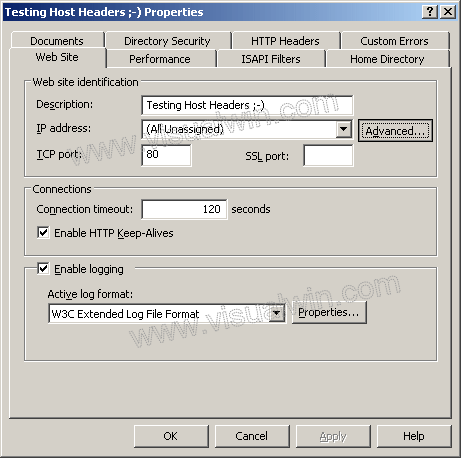
Now click Add
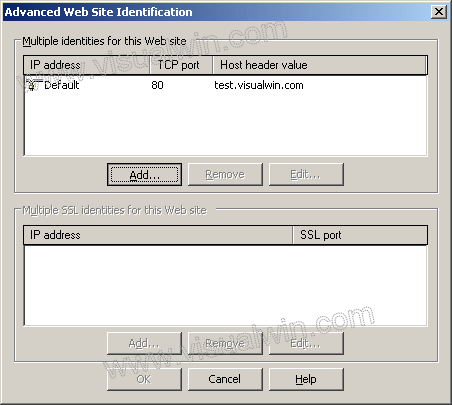
Put in the TCP port 80 (port 80 is the default website port, so people can type http://some.site instead of having to type http://some.site:port) and your new header below it
Now click OK and OK and you're done!
Q: Do I need to set anything in DNS or my website's Name Servers if I have a top level domain?
A: The answer is yes, you need to add an (A) name, but since all programs are different, I will not display how.
Copyright ©2002-2008 Jonathan Maltz. For trademark/copyright information, click here. About me. Main page. Contact me.
Write Your Own Operating System [FAQ]
Write Your Own Operating System [FAQ]
by Stuart 'Dark Fiber' George
Last Updated : Tuesday 23rd October 2000
Download a .zip'ed version of the os-faq here
- Introductions, Overview
- Kernel Questions
- Boot Loader and Boot Menu's
- Tell me about bootloaders and bootmenus
- Boot Sectors
- Master Boot Record
- GRUB
- LILO
- What is LILO
- Where can I get LILO
- XOSL
- System Commander
- Boot Magic
- COMPILERS
- DJGPP
- Watcom C/C++
- Visual C/C++
- Hardware
- CPU
- Memory
- IRQ's and Exceptions, PIC, NMI, APIC, OPIC
- Interrupt Service Routines (ISR's)
- Video
- Plug and Play
- PCI
- C Programming
- C++ Programming
- Linkers
- Executable File Types
- Filesystems
- Resources
- Books
- Reference Books
- The Indispensable PC Hardware Book
- Operating System Concepts
- Operating Systems : Design and Implementation
- Operating Systems : Internals and Design Principals
- Distributed Operating Systems
- Inside Windows NT, Second Edition
- Lion's Commentary on UNIX sixth edition, with source code
- UNIX Internals: The New Frontiers
- Some small kernels with source
- Chip Numbers, Acronyms and Things
- Books
- Third Party Tools
- Contributors
- Todo
Whats New!
- trying to add more material on various C/C++ compilers
- Added VMWare to the tools list
- Removed the link to the free Intel Developer CD's (offer is no longer valid)
- More info on some boot mangaers (xoxsl, system commander, boot magic, etc)
- Fixed those nasty link colours
| Next | Skip Next | Next 5 | List Sites |
Subscribe to:
Posts (Atom)