When browsing Blogger powered weblogs
hosted on blogspot.com domain or custom domain, there is always a NavBar (Navigation Bar or Banner) that appears on top of the blog. The Blogger NavBar contains Search Blog textbox, Flag Blog
to notify Blogger about objectionable contents on the blog, Next Blog link to visit another blog randomly, plus links to create a blog or sign in to Blogger.
No many visitors nor bloggers themselves may find it useful though. It’s possible to hide and remove the NavBar with a little CSS hack. The trick will not interfere or mess up with the custom layouts that webmaster has designed, and pretty safe and easy to implement. In fact, if you’re publishing the Blogger blog to own custom domain with FTP or SFTP, it’s possible to turn off NavBar.
Turn Off and Disable NavBar in Blog Published by FTP or SFTP
1.Login to Blogger.
2.On the Blogger Dashboard, click on the Template link of the blog that you want to disable its NavBar. You can also click Customize on NavBar while visiting your blog.
3.The Edit HTML page under Template tab should be loaded. Click on the drop down box beside Change the Blogger NavBar and select Off.
4.Click on SAVE TEMPLATE CHANGES button when done.
Remove and Hide NavBar in Blogger Widget Template
1.Sign in to Blogger.
2.On the Blogger Dashboard, click on the Layout link of the blog that you want to disable its NavBar. You can also click Customize on NavBar while visiting your blog.
3.Under the Layout tab, click on Edit HTML tab to view the template’s HTML code.
4.Search for the following line of code:
]]>
Before the line, add in the following line of code:
#navbar { display: none; }
or:
#navbar-iframe { display: none !important; }
5.Click on SAVE TEMPLATE to make the change effective.
Remove and Hide NavBar in Blogger Classic Template
1.Login to Blogger.
2.On the Blogger Dashboard, click on the Template link of the blog that you want to disable its NavBar. You can also click Customize on NavBar while visiting your blog.
3.The Edit HTML page under Template tab should be loaded. If not, go to the tab.
4.Search for the following line of code:
< /style>
Then, add the following line of code before that line:
#navbar-iframe { display: none; }
The Blogger Classic Template uses iframe to load the NavBar, and styles it with ID named navbar-iframe. The name actually also works for new Blogger Widget Template too.
5.After hiding the Nav Bar in Blogger using Classic Template, there tends to be a gap that replaces the navigation bar. The gap may be white, red, green, blue, or black in color, depends on what is your background color. To remove the gap, find the following code (normally near the top of the HTML):
body {
Add in the following like of code after the body tag:
position: relative;
top: -32px;
6.Click on SAVE TEMPLATE CHANGES button when done.
Tip: To display and show NavBar again, just remove and delete the additional codes that have been added.
Sunday, September 27, 2009
In Windows, if we right-click on CD/DVD drives, we get an option to "Eject" the tray but we don't get option to "Insert" the tray. In this tutorial, I'll tell you a trick to add "Insert" option in CD/DVD drives context menu.
http://img.photobucket.com/albums/v374/vishaal_here/Add_Insert_Option_in_CD_DVD_Context.jpg
Here is the step-by-step procedure:
1.) Download following zip file, extract it and copy the DLL file to "%windir%\System32" folder:
cdeject.zip
2.) Now download following zip file, extract it and then run the .REG file:
insert_reg.zip
That's it. Now you'll get an extra option "Insert" in CD/DVD drives context menu, which will make the life easier and you'll not have to press the insert button at your CD/DVD drive each
time.
Source http://www.askvg.com/add-insert-option-in-cddvd-drive-context-menu/
Friday, September 11, 2009
Unicode Help Pages
 Unicode is an international standard to encode written characters in the computer. XOBDO uses unicode to display Indic Languages, i.e., Assamese, Bodo, Mising, Bishnupriya texts. Bodo uses Devanagari scripts whereas Assamese, Mising, Bishpriya etc use Eastern-Nagari Script. If your computer is NOT setup properly, you may not see Unicode characters (e.g. উল্লেখযোগ্য) correctly as shown below...


This is how you should see
 .
.How to configure Indic Language Support ?
To configue your computer, you need to(1) install unicode fonts. You can download such fonts from : (a) Chicago University's Page, (b) Wazu's Website , or (c) Ekushey.Org
(2) enable Indic Language supports. Windows XP and Vista come with all the required files. How to enable Indic Language Support can be found in Wikipedia .
How to write in Unicode (Assamese, Bodo, Manipuri etc)?
Once your computer is properly configured for Unicode display, you may like to write or type in Unicode. There are a lots of free software available in the internet that enables to do so. Two most common software that supports Indic scripts are: 1. BARAHA, 2. AVRO, or 3. Ekushey.OrgXOBDO's volunteers also developed a keyboard to carry out the task. Please find the details here...
 .
.Alternatively, you can use XOBDO's online SmartKeyboard 1.0
Wednesday, September 9, 2009
Setting Host Headers in IIS 6.0
Preface:
Many people would like to have several web sites hosted on their own computer, maybe they want something like hello.domain.com and goodbye.domain.com both on the same computer. IIS can use host headers to see what the end user tried viewing, and it will show the correct web page based on that.
Method:
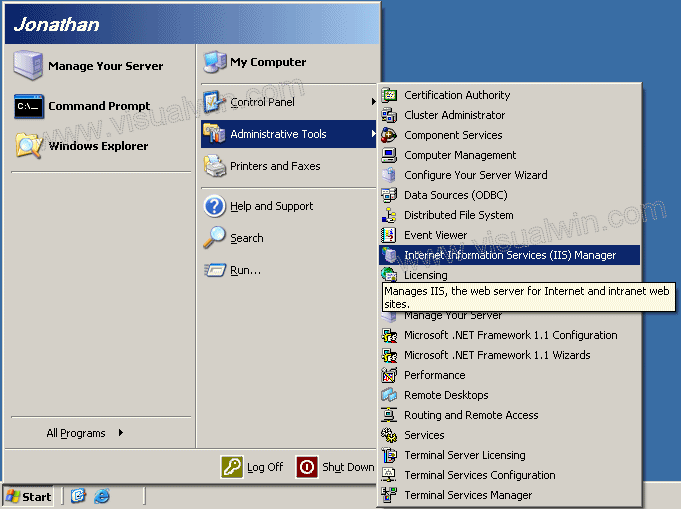
Load IIS from the Administrative tools in the Control Panel by clicking Start -> Administrative Tools -> IIS Manager (or loading the Control Panel, entering the Administrative Tools folder, and double clicking IIS Manager).
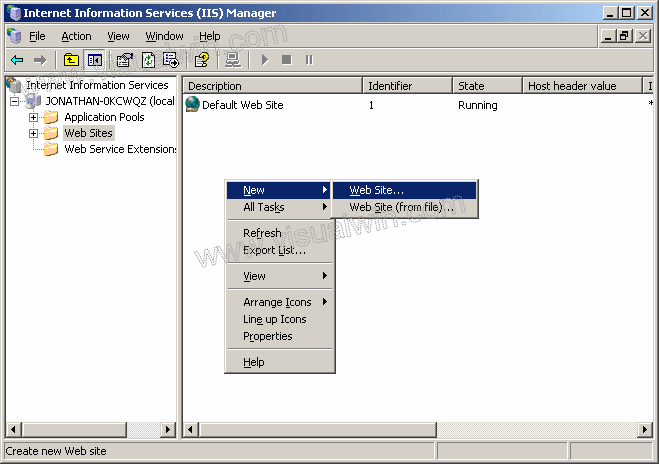
On the left side, expand your computer name, then click "Web Sites", right click in the right side, put your mouse over "New" and select "Web Site..."
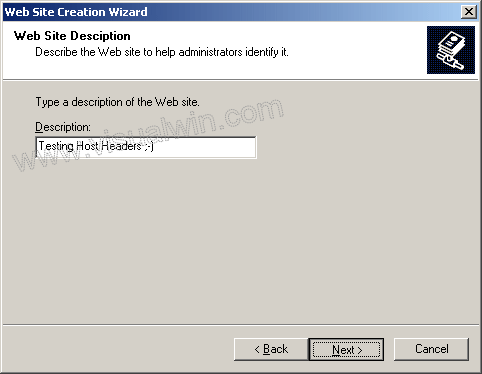
Click Next in the dialog, then put in a description of the new web site you are creating (can be anything)
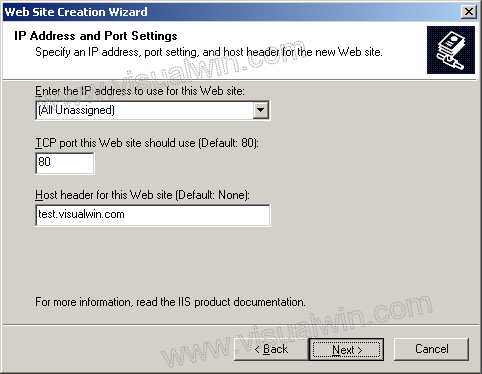
Now here's the important part. Go to the last text box and put in what you want the new Host Header to be
Now put in the path to your new site and make sure you keep "Allow anonymous access" checked
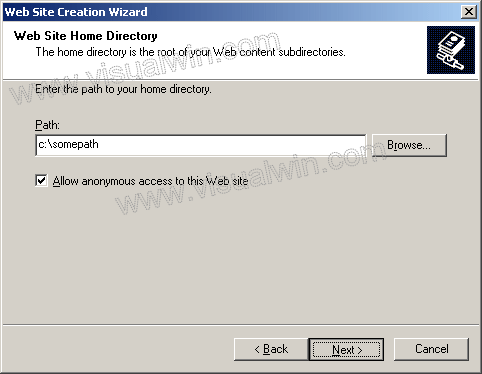
For added security, if you don't plan on using ASP or anything similar, then uncheck "Run scripts". You can always enable it at another time
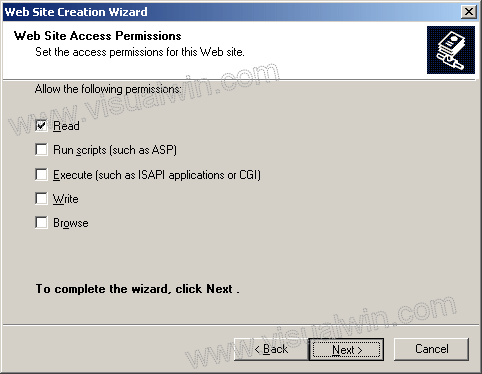
Click Finish on the next dialog and you're done!
Questions:
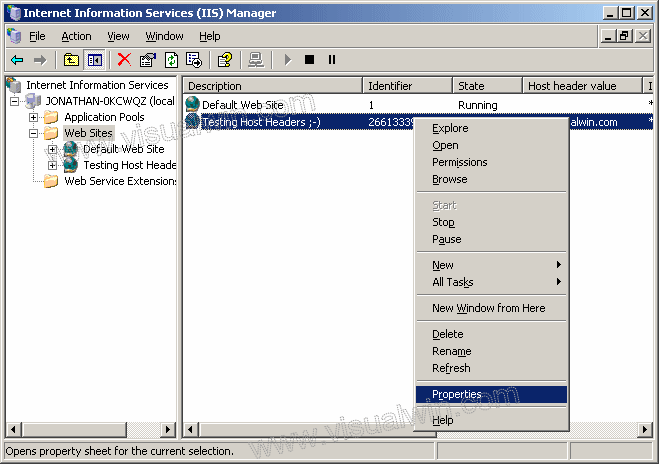
Q: How do I add a host header for a site already made?
A: Go back to where we were before. Click on "Web Sites" and right click the website and select "Properties"
In that dialog click the Advanced button
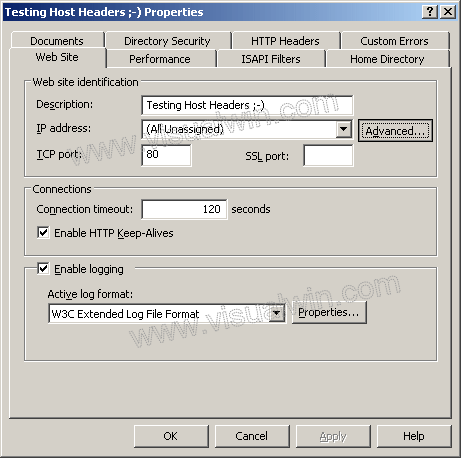
Now click Add
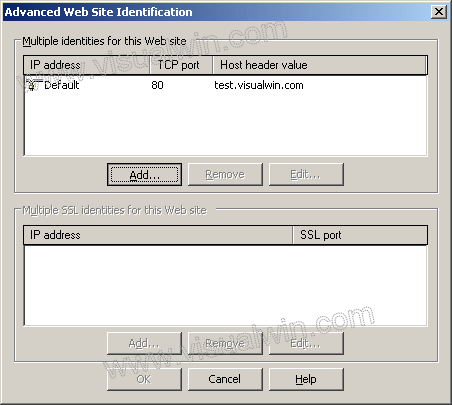
Put in the TCP port 80 (port 80 is the default website port, so people can type http://some.site instead of having to type http://some.site:port) and your new header below it
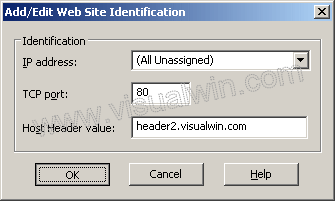
Now click OK and OK and you're done!
Q: Do I need to set anything in DNS or my website's Name Servers if I have a top level domain?
A: The answer is yes, you need to add an (A) name, but since all programs are different, I will not display how.
Copyright ©2002-2008 Jonathan Maltz. For trademark/copyright information, click here. About me. Main page. Contact me.
Write Your Own Operating System [FAQ]
Write Your Own Operating System [FAQ]
by Stuart 'Dark Fiber' George
Last Updated : Tuesday 23rd October 2000
Download a .zip'ed version of the os-faq here
- Introductions, Overview
- Kernel Questions
- Boot Loader and Boot Menu's
- Tell me about bootloaders and bootmenus
- Boot Sectors
- Master Boot Record
- GRUB
- LILO
- What is LILO
- Where can I get LILO
- XOSL
- System Commander
- Boot Magic
- COMPILERS
- DJGPP
- Watcom C/C++
- Visual C/C++
- Hardware
- CPU
- Memory
- IRQ's and Exceptions, PIC, NMI, APIC, OPIC
- Interrupt Service Routines (ISR's)
- Video
- Plug and Play
- PCI
- C Programming
- C++ Programming
- Linkers
- Executable File Types
- Filesystems
- Resources
- Books
- Reference Books
- The Indispensable PC Hardware Book
- Operating System Concepts
- Operating Systems : Design and Implementation
- Operating Systems : Internals and Design Principals
- Distributed Operating Systems
- Inside Windows NT, Second Edition
- Lion's Commentary on UNIX sixth edition, with source code
- UNIX Internals: The New Frontiers
- Some small kernels with source
- Chip Numbers, Acronyms and Things
- Books
- Third Party Tools
- Contributors
- Todo
Whats New!
- trying to add more material on various C/C++ compilers
- Added VMWare to the tools list
- Removed the link to the free Intel Developer CD's (offer is no longer valid)
- More info on some boot mangaers (xoxsl, system commander, boot magic, etc)
- Fixed those nasty link colours
| Next | Skip Next | Next 5 | List Sites |
Wednesday, September 2, 2009
Create a Stylish Business Card in Photoshop

Create a Stylish Business Card in Photoshop
Hello My Dear Friends, Sorry for being so late in publishing my next tutorial,
but i assure you that from now we will post some very unique, and interesting
tutorials on Photoshop. By the way, you might find some english mistakes,
maybe a lot sometimes, but I will try my best to make it as legible as
possible.
Today we are going to "Create a Stylish looking Business Card in
Photoshop". Its an very easy and simple tutorial to understand.
This tutorial is something inspired by "Ismaelgnc's
Business Cards
on flickr. I like the idea and the way of presentation, so i decided to share
the steps behind creation of Business Cards but in my own way. So lets start
with it...!!
STEP 1
Lets start with opening a new File in photoshop of 800px x 700px
dimension by clicking on File menu > New or pressing CTRL + N
on your keyboard.

Creative Business Card Tutorial - Step 1
Use the settings as it shown in the image above.STEP 2
After opening a new file, Set Foreground Color to #000000 (black) and
Background Color to #dda100 (ocre yellow). After Doing these, Go to Filters
menu > Render > Clounds.
After applying Render > Clouds filter, your image will look like this:

Creative Business Card Tutorial - Step 2
Then add a blank layer over this and fill it with black color and set its opacity to 65%. Till now we have completed the background for
our business card.
STEP 3
Now add a blank layer on the previous black color layer and name it
as "card". Now with Marquee tool selected (M), draw a rectangle in
center of your image, and fill it with black color. Now go to
"card" layer's Blending Options or just double click on
"Card" layer. In Blending options Dialog box, choose
"Gradient Overlay".
In this, choose Blend mode to 'Normal' ;
Opacity to '100%' ;
Gradient color from Black to Grey (#000000 to #6A6A6A) & Check the
Reverse box;
Style = Radial , Align with Layer ;
Angle equals to 0 ; and
Scale to 150% .

Creative Business Card Tutorial - Step 3
and also apply outer glow property to this layer in blending options.Use the settings shown in above image and click on Ok. Now you have
some similar to image shown below:

Creative Business Card Tutorial - Step 3
Now lets move to the next step !!STEP 4
After doing all the above steps, add one blank layer above the
"Card" layer and name it "Strip". Again in this
layer draw a rectangular Marquee and fill it with the yellow bg color. Now
transform it (CTRL + T) slightly to the left, in this way so that its width
covers the Left top corner of the card below.

Creative Business Card Tutorial - Step 4
Now while "Strip" layer still selected, press CTRL key + click on the "Card" layer. This will select the filled area of
"card" layer. Now we have to delete the extra space from the strip
layer, so to invert the selection, press (CTRL + SHIFT + I) and press delete
key to remove the extra space.
Now make two duplicate layer of the "Strip" layer by right
click on Layer > Duplicate layer, above the original "Strip"
layer.
Name them "Strip Texture" and "Strip Shadow"
respectively. Now drag "Strip Shadow" layer below the
"Strip" layer and fill Black color in it instead of yellow color.
Now Go to Filters menu > Blur > Motion Blur & apply motion
blur with 0 degree angle and 40 px distance.

Creative Business Card Tutorial - Step 4
"Strip Shadow" layer.
STEP 5

option. In this use "-54 degree angle" and 40 px distance.
and click on Ok button.

Now come to "Strip Texture" layer and fill it with black color same
like previous step. Now CTRL + Click on "Strip Texture", this will
create selection around the black space.
Go to Filters menu > Noise > Add Noise. and select the settings as
shown in image below.
Creative Business Card Tutorial - Step 5
After that , immediately go to Filter menu > Blur > Motion Blurand click on Ok button.
Now change the blending mode from 'Normal' to 'Linear Dodge' of
"Strip-Texture" Layer. Now you have something Similar to the image
shown below :
Creative Business Card Tutorial - Step 5
STEP 6

After this, Select the Type Tool and insert the desired text... whatever you
want to write.

Now after this, again move to "Strip" layer and open its Blending
Option dialogue box. In which select "Gradient Overlay" property and
choose the settings shown below :
Creative Business Card Tutorial - Step 6
want to write.
After Inserting Text in your image, add a blank layer named as
"Card-Texture" above all the layer. Now while
"Card-Texture" layer selected, Press CTRL and Click on
"Card" layer to select the filled area. After Selection go to
"Card-Texture" layer and fill it with black color. Now change the
blending mode of "Card-texture" layer from 'Normal' to 'Soft
Light'...
ok. Now you Have an Image similar to shown below :
Creative Business Card Tutorial - Step 6
STEP 7
Its looks like we have almost completed....the only thing remaining is to
add fire in the Card. For that.. i used a stock photo from http://www.sxc.hu/photo/1067967![]() .
.
Import it in your file and adjust it accordingly...
To delete the unwanted parts from flames... use Quick Mask option.
If you dont know how to use quick mask.. then you have to visit my next
tutorial in which I am going to show you "How to
Create a burning word"
FINAL RESUL

Here is our final image. Looking cool !! You can view the final
image preview below or view a larger
version here
Creative Business Card Tutorial - Final ResultTill then enjoy surfing and if you want to Download the
original Source file, then here is the link below :DOWNLOAD PSD SOURCE FILE

Subscribe to:
Posts (Atom)